🏡 Safety Meets Style: Elevate Your Home's Protection!
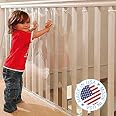
The KidKusion Indoor/Outdoor Banister Guard is a versatile safety barrier designed to protect children and pets from falls. Measuring 15 feet in length and 33 inches in height, this clear plastic guard is easy to install with included tie straps and can be combined for extended coverage. Made in the USA, it’s lightweight yet durable, making it an essential addition to any home.
| Mounting Type | Wall Mount |
| Target Species | Dog |
| Unit Count | 1.0 Count |
| Age Range (Description) | Kid |
| Manufacturer | KidKusion |
| UPC | 731900046002 |
| Global Trade Identification Number | 00731900046002 |
| Product Dimensions | 15 x 2 x 33 inches |
| Item model number | 4600 |
| Is Discontinued By Manufacturer | No |
| Target gender | Unisex |
| Material Type | Plastic |
| Additional product features | Includes Installation Kit |
| Number Of Items | 1 |
| Batteries required | No |
| Item Weight | 4 pounds |
J**Y
Great kid-proofing solution- Aesthetic and Effective!
I have installed this type of banister guard in three houses now. I love it. I love that you can't see it from a distance compared to the mesh designs, I love that kids still can't throw things through holes because it's a complete barrier, I love that it wipes clean very easily, and I love that I can install a 15 foot section of it in about 25 minutes. I have always kept the install very easy. I just punch holes with the hole punch that comes with it and zip tie it every foot or two at the top and bottom. I have done all installs on my own. As long as you are patient and work a few feet at a time and snug up each zip tie adjusting the position on the bannister as you go, you can install it fine on your own. The only annoyance is that it can be loud if a kid hits it, but then you tell the kid to knock it off. I also think it's pretty reasonably priced for how great it is. I even installed it in a vacation house that had a pool table on an upper level, and you couldn't even tell it was there, but at least pool balls weren't dropping on our heads anymore! I've had this installed for years and it holds up well.
C**7
Great Safety Solution
I used this for my 2nd story apartment patio. The rails were just a bit wide and I wanted to be sure my 7 pound Yorkie mix would be safe. I just rolled this out and screwed the ends to the wall frame. Pros- It works perfectly. It’s clear so it looks great. It’s thick and secure. Cons- when the wind blows hard you can imagine the flapping in the wind sound. You see I have a screen that goes from floor to ceiling… so I could only anchor it on the ends (with screws) and the very middle (with a little strip of Velcro). If you don’t have a screen that goes floor to ceiling then you should be able to use the zip ties to anchor it around the rails and you won’t have that noise issue. Tips- have an electric screwdriver/drill on hand. It will make the job go so smoothly. I recommend this banister guard. I’m really happy with this purchase.
N**K
No escaping puppy.
I purchase an 8-section gate/fence to enclose a small area for our new puppy. The gate/fence was perfect. It spanned 16 feet. I purchased the fence for our new miniature pinscher puppy. He came home at only 2 pounds, so we needed to do something about the bar spacing on the gate and fence panels (they were 2-1/2 inches apart).We purchased this clear banister guard. The guard was 15 feet long and turned out to be just the right size for the fence with enough to make 9 panels if needed. I cut the guard into 21” x 26-1/2” panels (17” x 24-1/2” for the gate section) and attached them to the fence using the zip ties that came with the guard (had to purchase additional because I didn’t position them correctly the first time). I attached the cut pieces of the guard to the outside of each fence section. A hole punch was included with the guard which made assembly very easy. I attached a horizontal placed zip tie at each corner of the guard and around the end post of each fence. I then attached zip ties from each corner to the fence top and bottom rails, attaching an additional zip tie in the center of the guard to the top rail. It worked perfect. I had no issue completing this project all by myself. The plastic guard is very tough and did not have any breakage when pulling the zip ties were pulled tight. It worked perfect and you can't even tell that the guard is on.Perfect gate/fence and now there will be no escaping puppy.
W**N
Ultimately met my needs, but just a heads up ...
I think this would be relatively simple to install on a straight/level railing w/spindles. However, I needed it to block the spindles on my STAIRCASE which is obviously on an angle. For some reason, it didn't occur to me when I ordered it that I couldn't simply 'tilt' it and expect it to fit my angled staircase. Upon receipt, it was clear that it was going to require more than just me to install it. It is definitely a two-person job! Since I live alone, I was afraid that I was going to have no choice but have a glass company come out to measure & have a piece of plexiglass custom cut & installed, which would have obviously been much more expensive (or hire a handyman; hard to find a good, reliable, affordable one ... but I digress). Ultimately, after it sitting for almost 18 months, I finally had a handy & helpful family member come over and help me install it.First, the plastic is thick and a bit heavy, and since it comes in a roll it wants to curl back on itself during installation. Second, forget about using the hole punch that comes with it unless you don't need to punch many holes and those holes will be very near the edges of the plastic -- basically, what they provide is a very cheap hole punch that a child would use to cut craft paper. What works perfectly is an AWL ... the added benefit to using an awl is that it creates a smooth, almost rounded surface vs. a sharp edge, and of course you can make the holes anywhere you want in the plastic (we made holes mid-way down in the middle of the plastic and never could have done that w/the punch provided).To install on my staircase, we cut the plastic to slightly wider than needed. Then, we each held one end of the plastic and lined it up to the bottom of the wood stair rail/cap. Here's where a THIRD set of hands would come in handy, if you don't have a clamp to hold it in place like we did. Then, we put down a piece of scrap cardboard on the base of the staircase to protect the wood, then cut the plastic in a horizontal line to the exact height/angle we needed so that the spindles were covered from top to bottom. After that, with both ends then clamped, we determined the best placement for the ties and made the holes with the awl. Once it was secured on the top, because I did not want to put any holes in either my wood railing/post or my wall, we wrapped the plastic around the end (spindle on one end and post on the other) and then secured those with ties after using the awl to go thru both layers of the plastic so that both ends were wrapped and no hard edges were exposed.I would add a photo so that this would be a bit easier to visualize, but I am not sure how (there is no reference to photos on this review page).
Trustpilot
1 month ago
5 days ago